1961–1964 Panhead 12-Volt Coil Upgrade
Finding a pair of 12-volt ignition coils small enough to fit under the stock cover on a 1961–1964 Harley-Davidson Panhead Duo-Glide turned out to be a lot harder than I expected. The dual circuit breaker ignition needs the right coil arrangement, and simply converting the motorcycle to 12 volts does not mean the parts will still fit neatly where Harley intended them to go.
I wanted my 1964 Duo-Glide to stay a reliable rider without looking like a collection of workarounds, so the goal was simple: use compact 12-volt coils that would work with the dual-points system and get everything back under a proper stock Panhead coil cover.
For more Panhead electrical and workshop articles, see the Panhead Tech section. Because this coil work was part of keeping my 1964 Harley-Davidson FLH Duo-Glide reliable without advertising the upgrade, it also fits into the larger Duo-Glide project. If you are also finishing the plug wire side of the ignition system, the related cloth covered spark plug wires for Panhead and Duo-Glide article covers fitting and crimping custom-length wires.
Electrical note: Verify coil resistance, wiring polarity, grounds, charging-system output, and point condition before powering any vintage ignition system.

Why the Stock Coil Setup Becomes a Problem
The 1961–1964 Harley-Davidson Duo-Glides used a dual circuit breaker ignition system, often referred to as a dual points ignition, with a manual advance. This arrangement meant that each cylinder had an individual circuit breaker that was timed to fire that cylinder’s spark plug. This also meant that there were two 6-volt ignition coils, one for each circuit breaker.
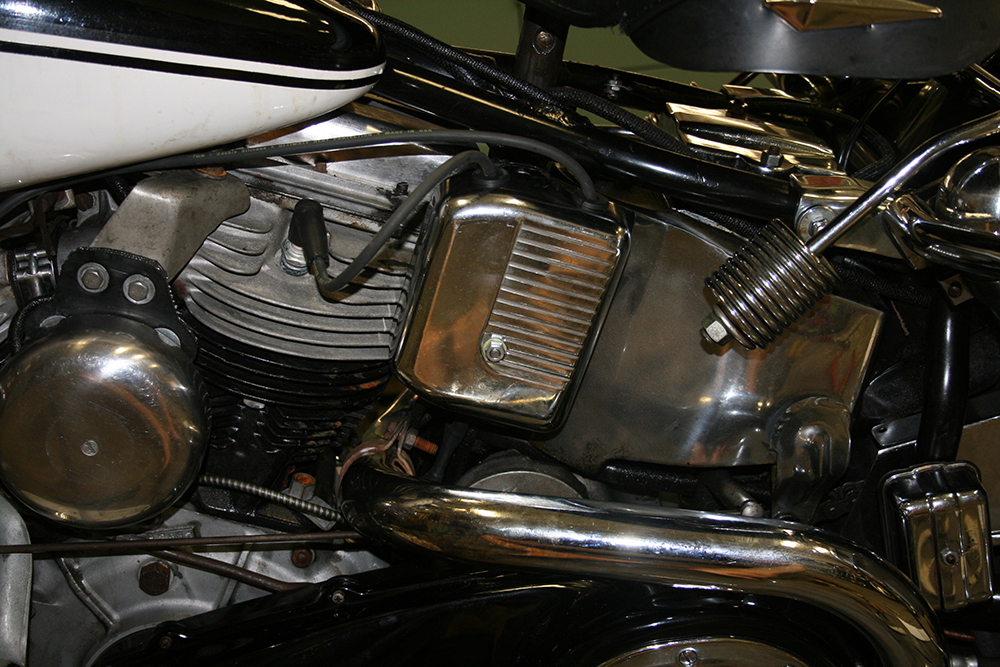
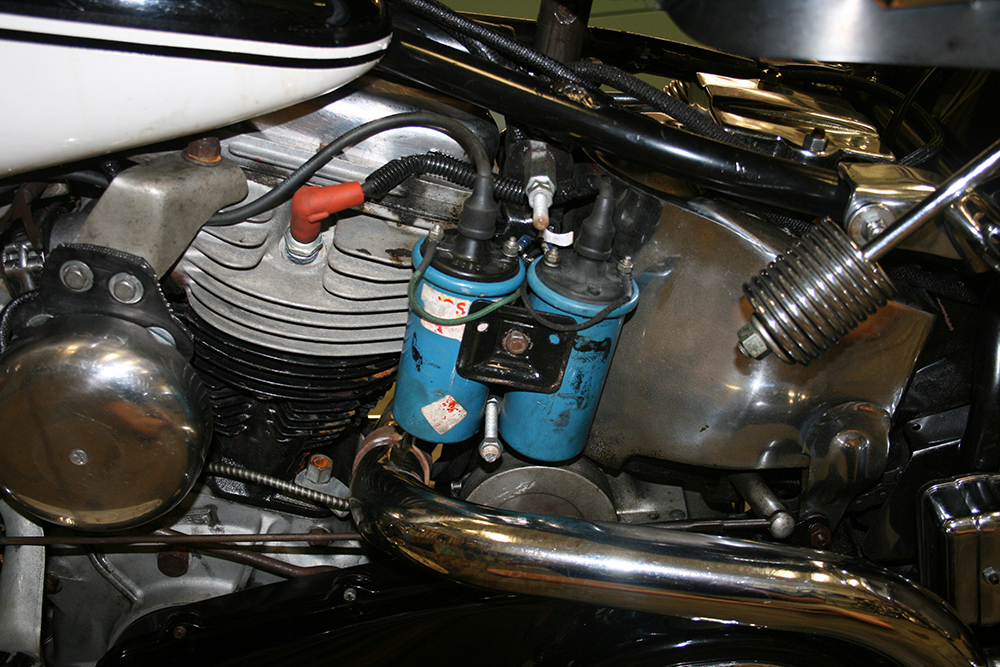
One common upgrade for motorcycles from the 1960s and earlier is to change the electrical system over from 6 volts to 12 volts. When I purchased my 1964 Duo-Glide, the original owner had already made this conversion, but had used a set of 12-volt ignition coils from a Volkswagen. This arrangement worked fine, but the larger coils needed a “custom” oversized cover to hide them from view.

Finding Coils That Fit Under the Original Cover
In keeping with my goal of creating a motorcycle that retained as many correct parts as possible, yet was a reliable rider, I decided to try and install the correct coil cover. I purchased an OEM cover on eBay and then started hunting for the right size coils to fit under it. The original 6-volt coils were 4 inches high and 2 inches in diameter and looked very much like a miniature version of the 12-volt coils used on most cars in the 1970s and 1980s. I searched the web for part numbers for a correctly sized replacement, but information on this upgrade seemed to be non-existent.
Next I decided to give Bosch a call, figuring they could just look up what I needed in their vast selection of ignition coils. This turned out to be a waste of time, because they could only search for coils based on the make and model of a vehicle. A couple more calls to Bosch Racing and some of their distributors also yielded nothing, so I contacted Dynatek.
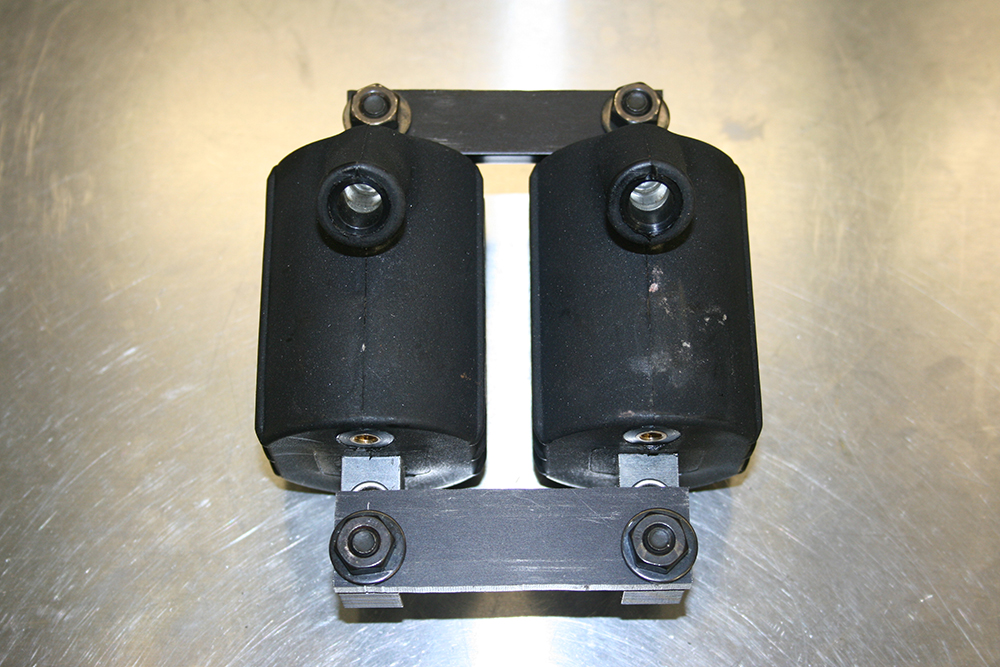
Dynatek did not have a coil that was the same profile as the original 6-volt unit, but they did make a pair of compact 12-volt coils with 5-ohm resistance that would work with my dual circuit breaker ignition. Realizing that this was probably my best option, I decided to take a chance and ordered the Dyna DC10-1 coil set.

Mounting the Dyna DC10-1 Coils
Once the new Dyna coils arrived, I removed the “custom” coil cover, the old blue coils, and the coil bracket from my motorcycle. I played around with positioning of the new coils until I found a way to mount them which would allow the stock cover to be used. Basically, I positioned the coils using the original mounting bracket, but with the spark plug wires exiting behind the bracket.

Since the front spark plug wire exited very close to the rear cylinder and the rear spark plug wire exited very close to the oil tank, I added a nut and washer to the mounting studs of the coil mount to space it out roughly 1/4 inch from the motorcycle.

I also felt that the coils did not mount as securely as they should and was concerned about vibrations causing one of them to slip out from under the coil bracket. Using some 1-inch aluminum bar stock, I cut two brackets to bolt the upper and lower mounting tabs on the coils together. This really made a big difference in how the coils felt when mounted in the stock bracket.
Wiring the Ignition Coils and Plug Wires
With the mounting complete, I rewired the ground and power connections, attaching them to the coils with the included ring terminals. I soldered these connections which should help them stand up to vibrations better than just crimping on the terminals.
The final step was to cut two custom length spark plug wires. A quick tip on making custom spark plug wires is to check with your local auto parts retailer. In my case I stopped by AutoZone and picked out two of the longest single spark plug wires which had the correct ends for my application. The cost per wire was only $5.99. When I got home, I carefully removed the terminal from one end of the spark plug wire, cut it to the length, and crimped the terminal back on.
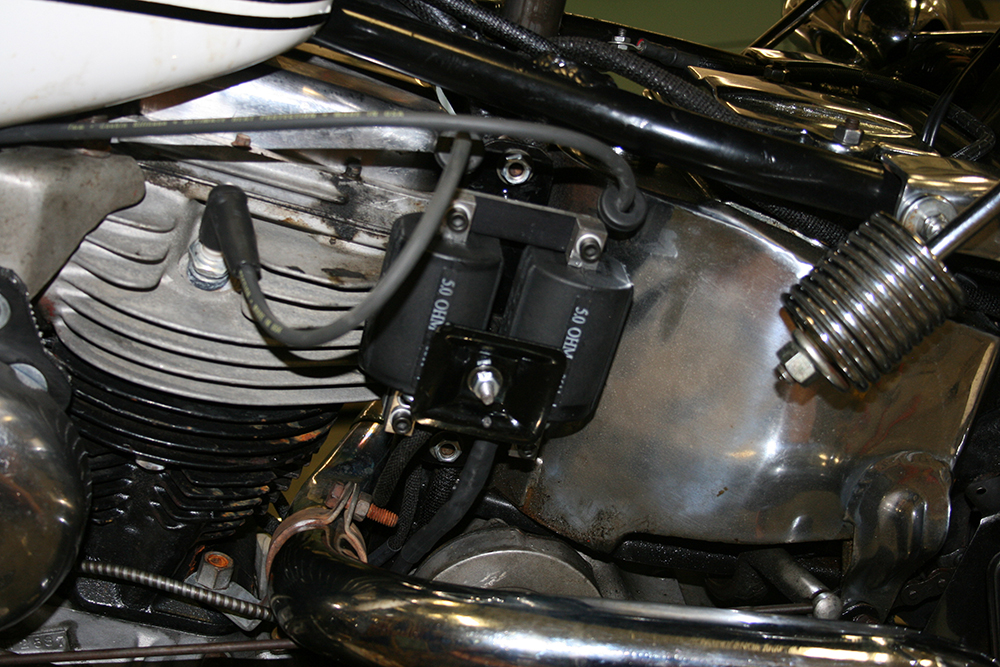
The final touch was to install the correct coil cover and fasten it in place.